
9. The Bank
Reconciling the bank has been the dread of many a sage user for a number of years. Xero has taken the scare out of this.
Xero makes reconciling a pleasure and you will find yourself doing this process every day. This will keep Xero up to date and help you get great financial information.
It’s easy to get behind with reconciling but as you will see with Bank Rules, Auto-Matching, and a clear and easy-to-use user interface Xero really have this nailed.
To understand what you need to do on this it might be worth thinking about how Xero treats Bank Information.
This (crude) illustration may help:
Sage
Post Sales Invoice >> Post Purchases >> Post Cheques >>> Post Remittances >> Wait for BS >>> Reconcile the bank >>Post Bank Payment’s
![]()
Under this method you would be keeping a theoretical rolling bank balance that you would reconcile to the statement once a month or less. This often caused a lot of problems when someone has posted a manual payment and then it didn’t appear on the bank.
Xero
It’s different in Xero.
Post Sales Invoice >> Post Purchases >> Process the Bank Statement
![]()
What this all means is the bank statement becomes the centre of the business and that bank information is coming into the business quicker and that information is more up to date.
To access a Bank Accounts either navigate from the Dashboard or go to:
ACCOUNTS >>>> BANK ACCOUNTS
The last method will take you to all your bank Accounts.
")
This section is all about a normal bank account.
This is what a normal bank account looks like in Xero
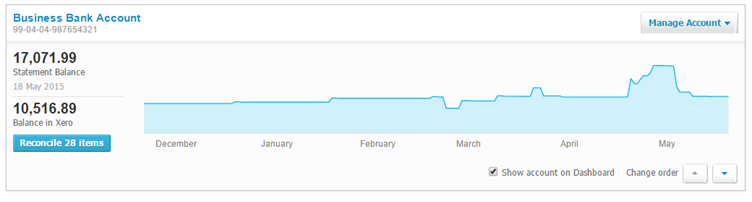
You can see you have:
Statement Balance – this is the balance Xero thinks is the balance in your real World Bank accounts
Balance in Xero – this is the reconciled balance in Xero
They are different because you have 28 items to reconcile – once you have reconciled all 28 items your balances will match.
")
Getting bank info in
Because Xero uses the bank as the centre of finances we need to get the information into Xero regularly.
There are 2 ways to get the bank information into Xero:
- A Bank feed
- Importing
What you must never be tempted to do is post the bank information manually.
Bank Feed
This is either achieved by logging into your online bank via Xero to establish the link and is very reliable.
Importing
Importing is the process of getting a file from your online bank periodically and importing it.
The best file type is either a Microsoft Money File .ofx or a .csv (.ofx is the preferred method).
You just have to ensure you have the correct date range when exporting from your online bank
To import go to Dashboard >>>> SELECT YOUR BANK (THREE DOTS) >>> Import a statement

Browse for the file you have downloaded from the bank
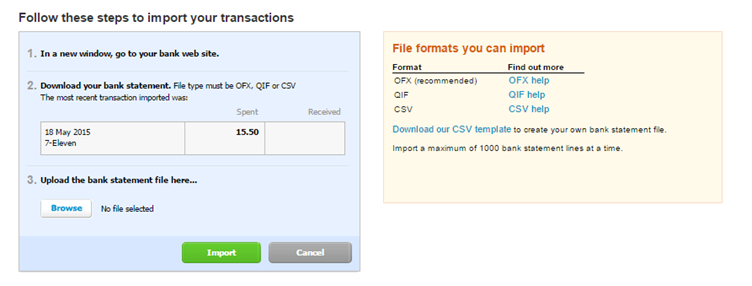
And upload.
A .csv may need some extra work to get it into the correct format. Most banks allow an .ofx file.
The bank feed is the preferred option if possible.
")
Reconciling the Bank
Reconciling the bank in Xero is basically telling Xero what to do with every line of your bank statement.
Click on the reconcile items button on the bank on the dashboard.
This is what you will be confronted with when you go to reconcile on the bank:
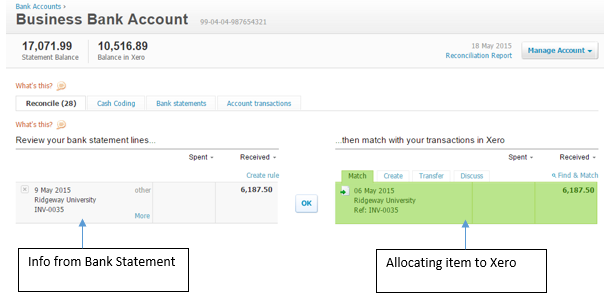
There are only actually three things you can do in Xero with each bank statement line. These are illustrated here:
![]()
Match – Match the bank statement line against an existing invoice or unreconciled item (created by a manual payment or receipt)
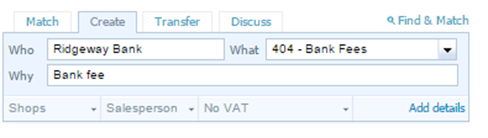
Create – Posting a payment or receipt where there is no invoice. Such as purchases not on credit and bank charges etc.
Transfer – Transfer between bank accounts or to a credit card
![]()
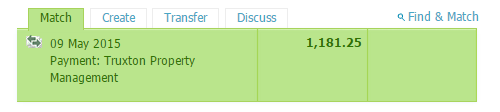
Matching
Xero can and will automatically match receipts and payments into the bank against existing invoices.
If it does this the item in the bank reconciliation will be green.

In actual fact this one is a match against a manual payment but it looks very similar to Xero when an invoice is matched.
Occasionally Xero will struggle to match where:
- There is more than one invoice for the same amount
- Your customer has paid more than one invoice or you have paid a supplier for more than one.
Where there is more than one invoice will see this:
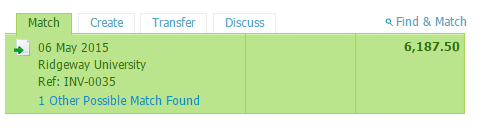
We need to tell Xero which invoice this relates to – click on the words 1 Other Possible Match or Find & Match and you will see this:
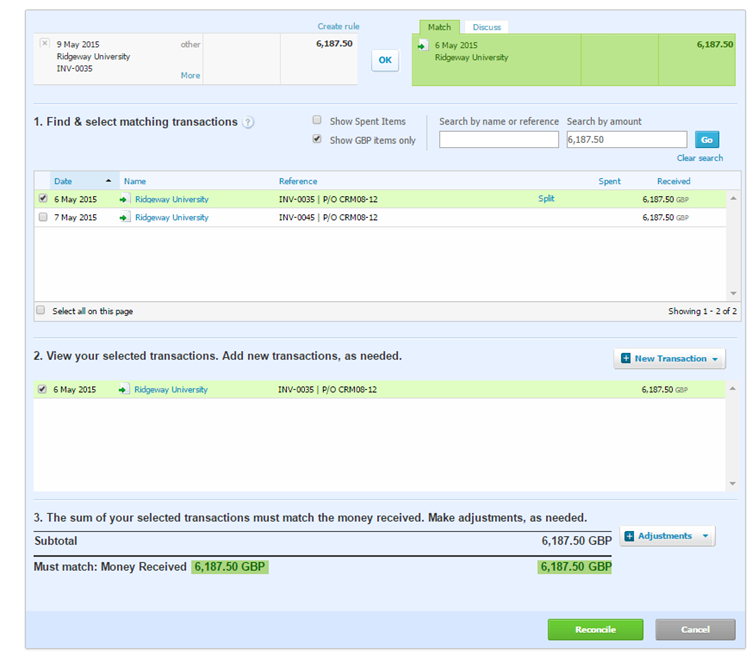
This lets you select which invoice or invoice this relates to.
In an ideal world, you can just select the correct invoice and click reconcile. If you do that the item will disappear from the reconciliation screen and you will now have 27 items to clear and the difference between the Xero balance and the statement will reduce.
However, there are often adjustments to put through – you can do that by clicking here:
![]()
This is used for larger items where someone has overpaid or pre-paid.
Or here

This is where you would but minor items such as bank fees. This is used for example where someone pay you after deducting their fee, for example, some merchant accounts will send you only the net amount of the invoice. An example of this is Amazon where they pay net of their fees.
Split Payments
Occasionally you will only receive or pay a part of the invoice for example £500 off of a £1,000 invoice.
To process this you will need to click Find & Match find the invoice by searching by name or amount in this box:

Select the invoice and click this button:

You can then allocate the money you have received or paid to this invoice:
![]()
When you have selected split and then click reconcile this will reduce the amount show on the invoice.
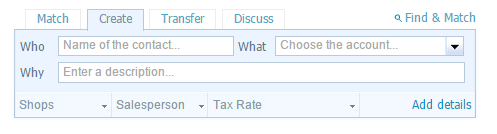
Creating
This is where we tell Xero what to do with an item and would be used where there is no invoice posted as is the case where there is no delay between receiving the invoice and paying it e.g. sale or purchase is not on credit.
This actually has all the same details as a bill:
- Contact
- Account
- Description
- Tracking
- VAT Rate
You would only use this where the payment is going wholly to one account. As in the bank charge above.
If you wanted to add more detail to a create transaction, for example if you paid for two wildly different items on the same receipt or if one time had VAT and the other didn’t, you would need to click Add details. You will then see this screen:
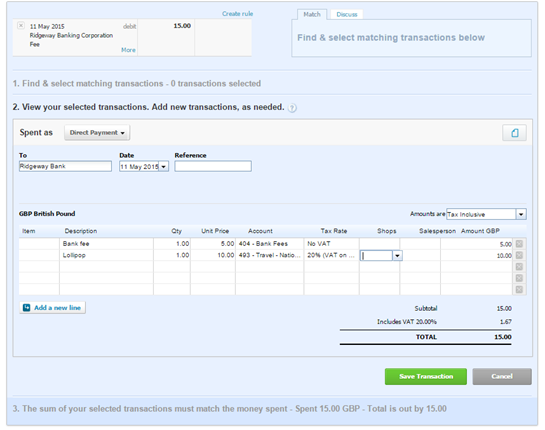
Your item would then be allocated to two separate accounts and vat would be accounted for separately.
Click Save and Reconcile or OK to reconcile.
BANK RULES
A bank rule is a way of setting up an automated transaction for spend money, receive money, and transfers.
For example, if you repeat a create transaction for bank charges each month a Xero rule could do this for you and automatically code these regular items.
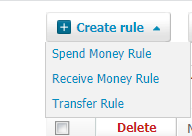
A rule can be set up for Receipts, Payments & Transfers.
This is an example of a receive money rule.
To set a rule click on the options dropdown next to the item on the bank reconcile screen and you will then be taken to this screen:
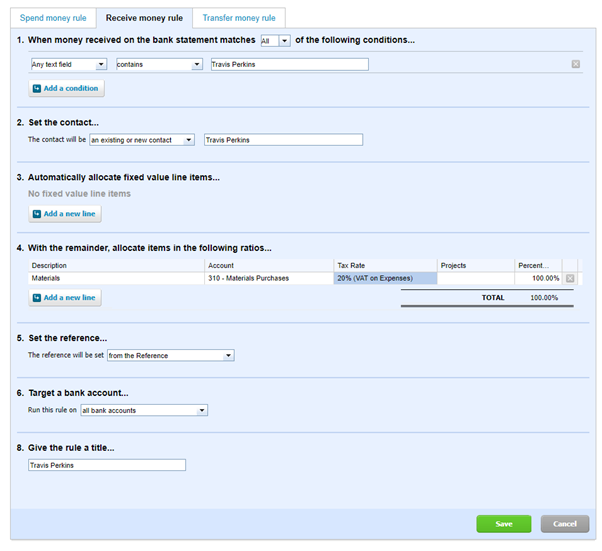
We recommend you:
- Delete any blank lines under the first section and set the condition to description contains – so this picks up your item. Don’t make these two specific.
- The contact is set to Payee.
- Ignore this.
- Post this as you would have done normally for the expense item.
- Set the reference from the reference
- Change this to all banks
- Give the rule a name
Click Save and then click – Reconcile – Your Bank Account Name to take you back to your bank reconcile screen
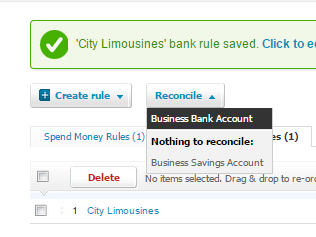
Your rule should now be working and no more typing for you. If the rule works it will look like this:

Just click ok to reconcile it.
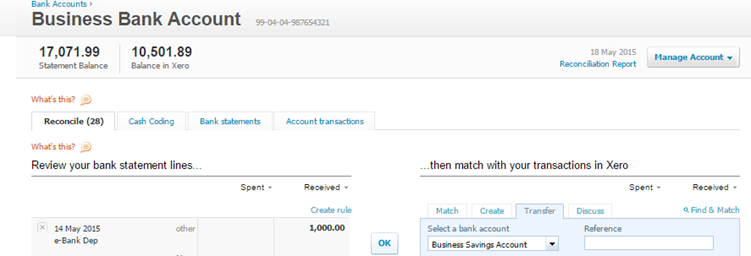
Transferring
![]()
Transferring is relatively simple just select the account you want to mark as a transfer and Xero will reconcile in this bank but also put the amount in the bank you are transferring to as an unreconciled transaction ready for you to match against the bank statement for that account.
We also use transfer when reconciling credit cards. More about that later. You can set up Transfer rules.
Transfer Rules
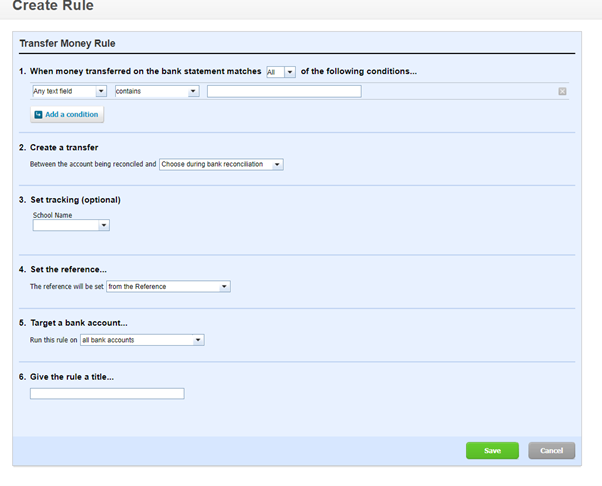
This rule looks for certain text and then automatically sets up the transfer. This is ideal where you run a savings or deposit account.
Cash Coding
When you look at your bank reconciliation screen:
You will notice three more tabs – Bank Statements are pretty obvious but the other two are worth exploring:
Cash Coding
Account Transactions
Account Transactions are just the place where all your reconciled and unreconciled manual payments live. As soon as you match and invoice it gets listed under this tab. As soon as you enter a manual payment it gets listed under this tab.
You can under a reconciled item by selecting it in Account Transactions and clicking on Remove and Redo.
Cash Coding
Cash coding is a quick way to post expense transactions and can be used on any bank. If you have lots of the same type of transactions you can use cash coding to do this quickly.
The cash coding screen looks like this:
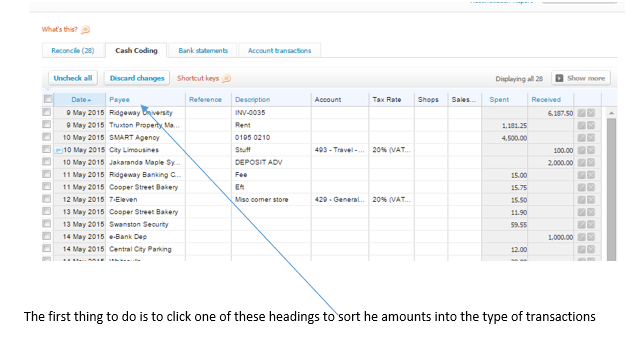
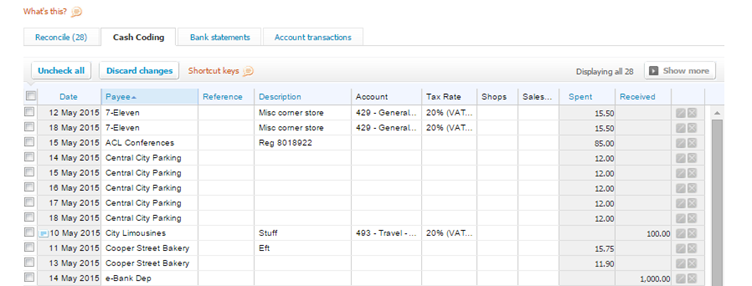
Then you can select all the same types of transactions by ticking each one or by selecting the top one and holding shift and then selecting the bottom one.

Then you start to code the top line and your description will be filled in each of the ones below it.
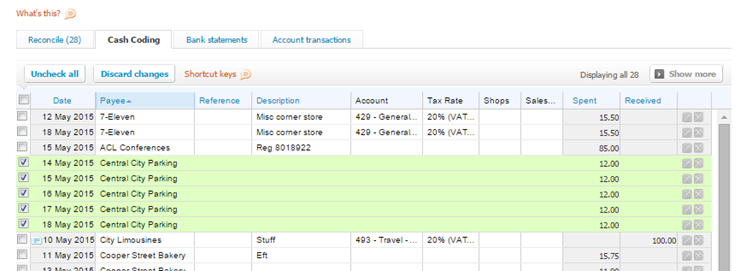
Once you are happy click on Save and Reconcile and these items will disappear off the list.
You have just reconciled 6 items in 1 minute.
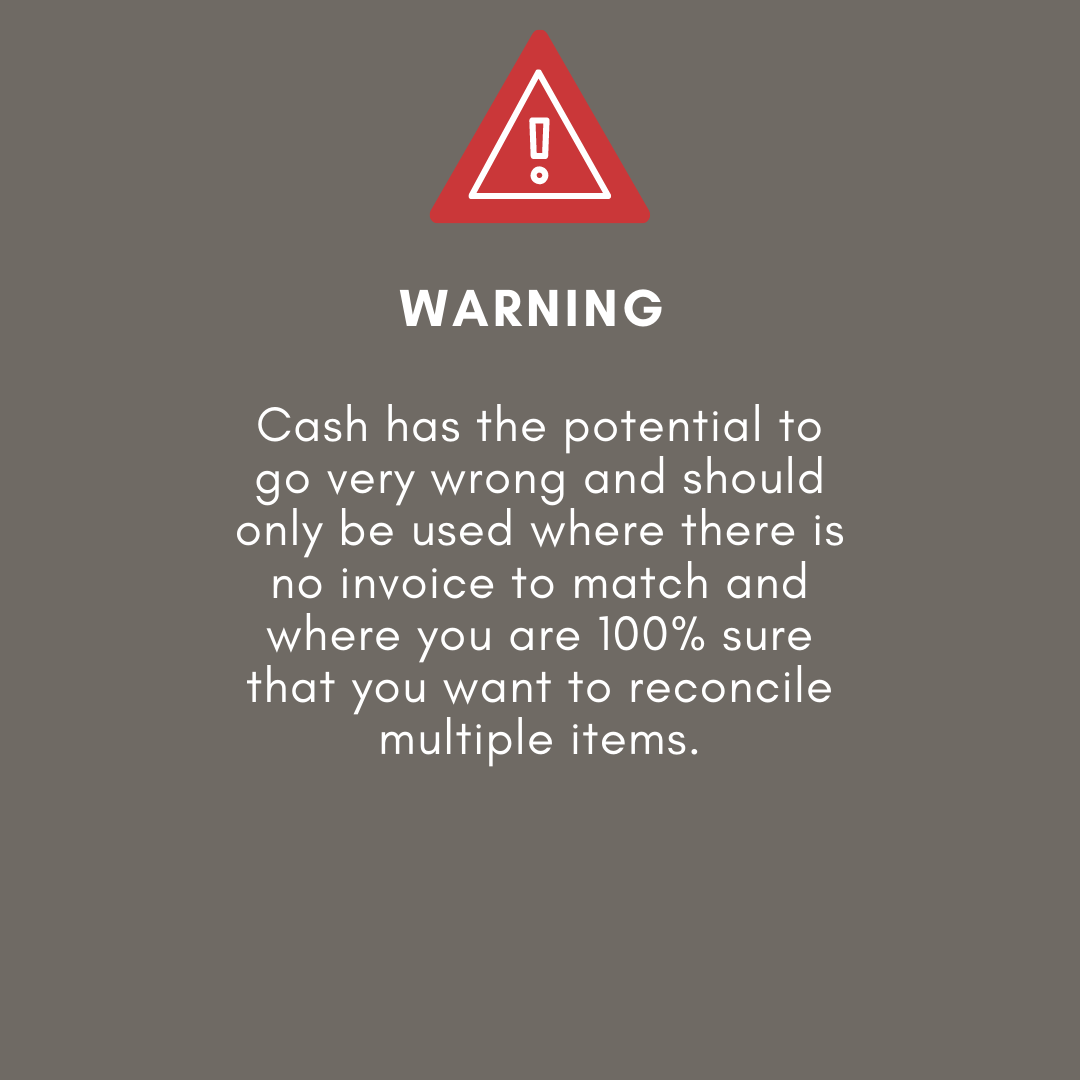
Again, this should only be used to reconcile items where you are confident you have no invoice and you have a receipt.
Credit Cards
Credit cards are exactly the same as a normal bank account it’s just they normally have a negative balance.
When you pay off the credit card transfer the cash from the main account to the credit card account then use a manual spend money transaction for all the things bought using the credit card.
CIS
If you do not operate under the Construction Industry Scheme ten you can skip this section.
Firstly, turn this feature on by navigating to:
ACCOUNTING >>>> ADVANCE ACCOUNTING >>>> FINANCIAL SETTINGS
And enter the relevant references
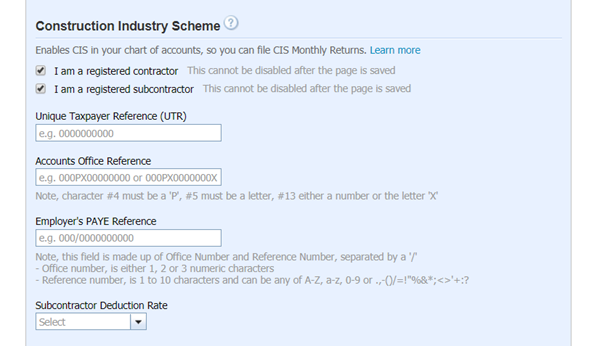
If you are both a contractor and a subcontractor tick both boxes.
Now set up your subcontractors on Xero – either find them or add them
CONTACTS >>>> FIND CONTACT >>>>> EDIT
Ensure you add all the following details:
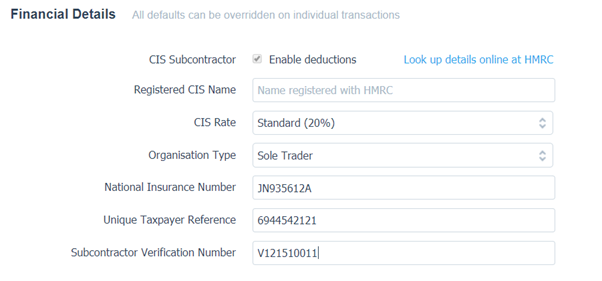
Subcontractors will now appear in a separate group on your Xero contact index.
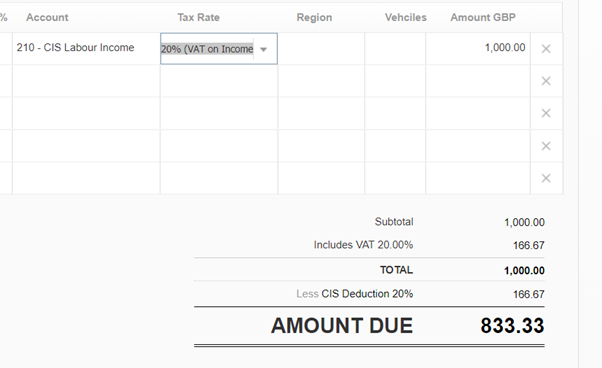
Now when you enter an invoice for this subcontractor you will enter it to the CIS labour Expense code (321) splitting out any materials on the invoice.
Xero will calculate the CIS due to be deducted:

When you raise a sales invoice, you post the labour element of that invoice to CIS labour income account code – Xero then sets aside the amount that will be deducted from you.
Filing the return
Each month a CIS return needs to be filed with HMRC to run the report go to:
ACCOUNTING >>> REPORTS
You have two options run the CIS Monthly Report just to look at and check CIS
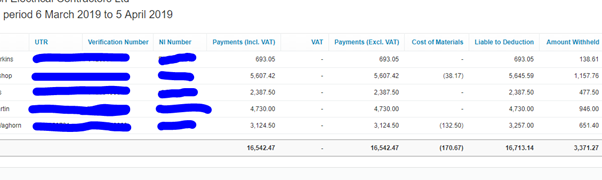
Or to file the return to do this run the CIS moth return and online filing from here you can check and file the return with HMRC
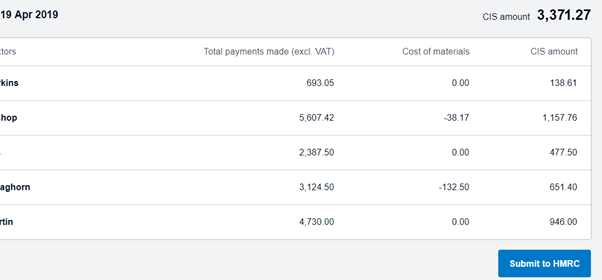
Finally, you can run statements for your subcontractors from reports:

")
")