
7. The Sales Process
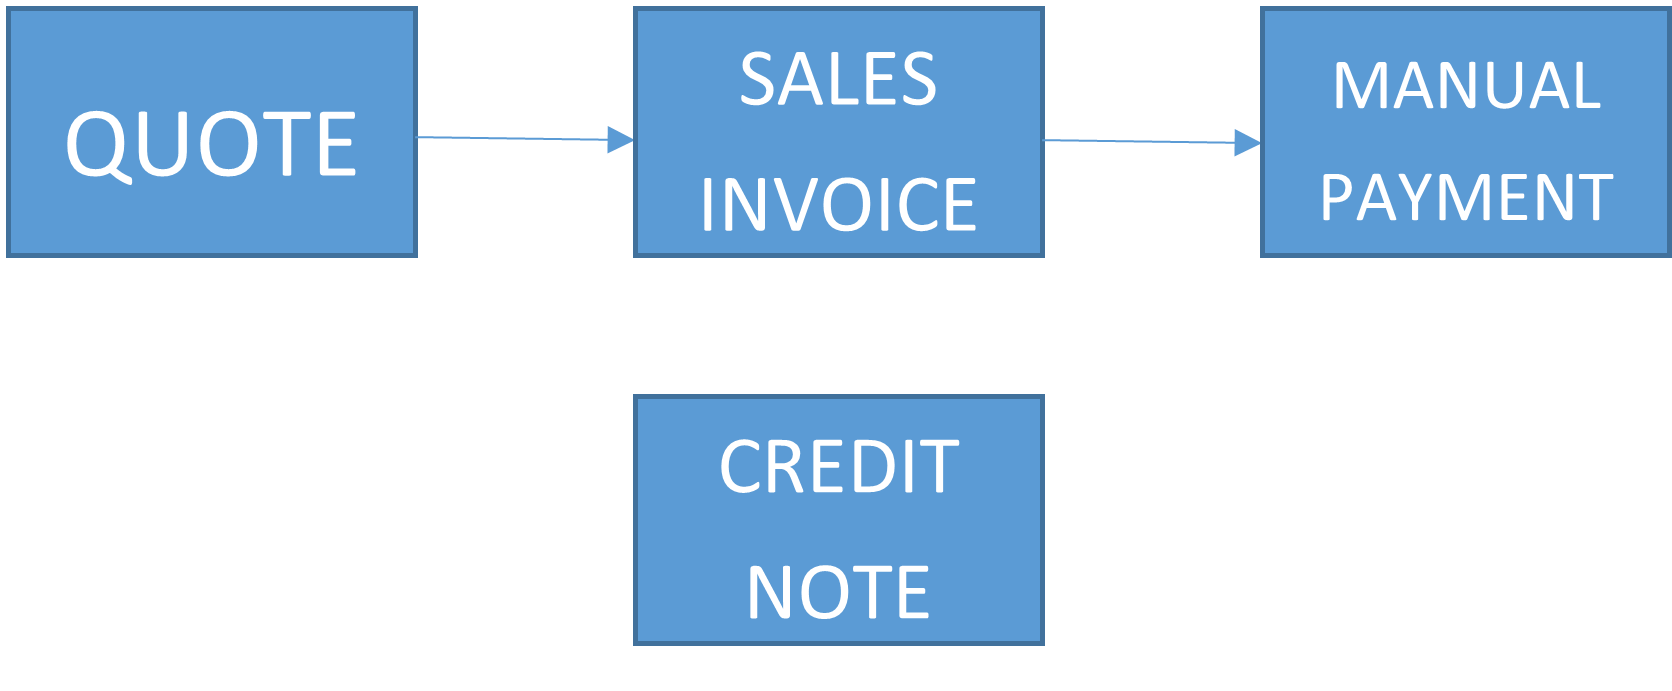
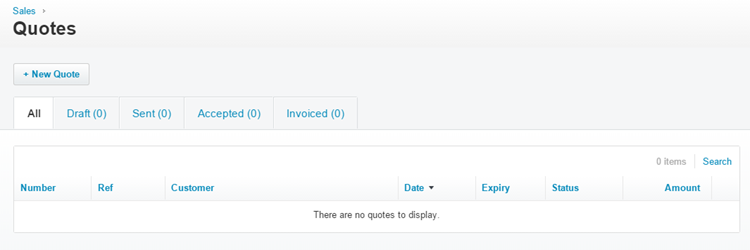
Quotes
Xero has a Quotation function built right into it. This is a good place to keep track of issued quotes.
BUSINESS >>> SALES OVERVIEW >>>> QUOTES >>> SEE ALL
Click New Quote
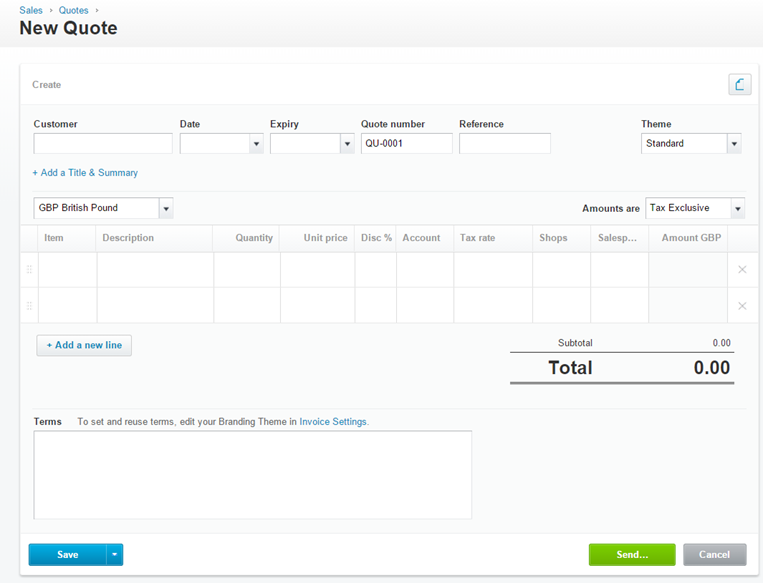
Complete the following on here:
Customer Name – This will either select an existing contact or create a new one.
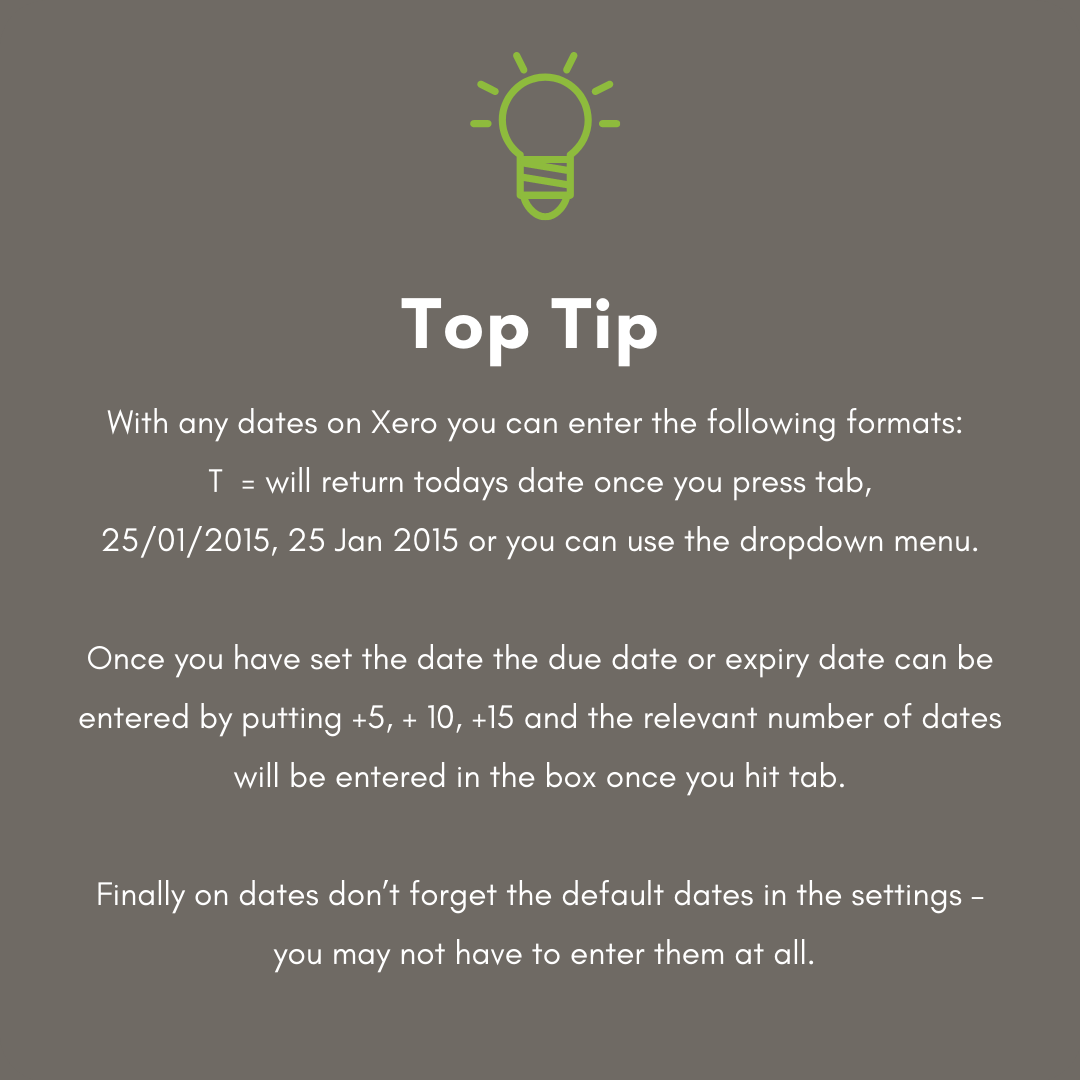
Date & Expiry Date – Enter the due date and the date the quote will expire. (its good practice to not hold your prices for too long as things may change)
Quote Number – This is automatic but can be overwritten
Theme – Select your branding (only applicable if you are using Xero to run multiple brands)
Select Item – Select pre-filled item or type description – this is controlled in products and services
Enter Description – Outline the details of your quote
Adjust Quantity and Unit Price
Account – Allocate this quote to an account code – nothing will happen until you convert this into an invoice
Add Tracking Info (if required)
Terms – You can add terms to your quote here. If they are standard and you want them on each of your quotes you can adjust your branding theme for this – located in the settings page.
Once you are happy click save or send.
Save will save this as a draft quote and send will give you the option to email it directly to your customer.
If you would prefer to print the quote as a PDF and attach it to an email, then the easiest way to do this is to send a copy to yourself.
If you do send via Xero your customer will get a copy of your quote and the option to view this online from here they can approve, decline it or ask for an amendment.
What happens now?
If you go back to:
SALES OVERVIEW >>> SALES >>>> QUOTES >>> SEE ALL
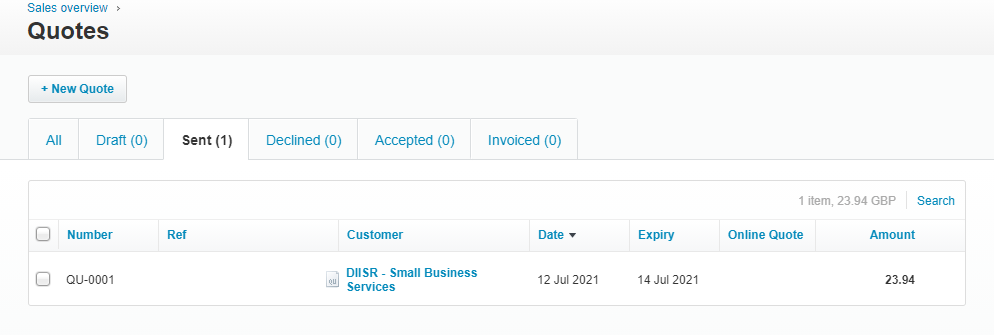
You will see a list of Draft, Sent, Accepted, and Invoiced Quotes.
If your customer accepts your quote they can view it online and click the accept quote bottom – if they don’t view these online you can manually accept the quote.
Find the quote and select it and then click Mark as Accepted and it moves the quote to accepted
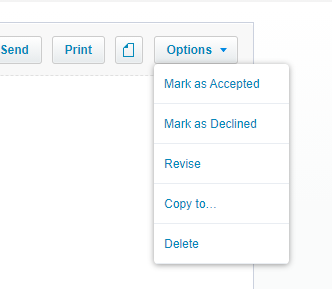
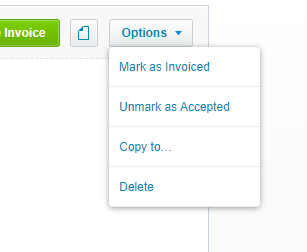
then click the quote again and it gives you an option to:
- Mark as invoiced
- Copy to bill
If you mark it as invoiced it keeps the quote screen area clean you can then copy the quote to:
- Another Quote
- A Sales Invoice
- A Purchase Order
- Bill
This cuts down on the time spent duplicating effort.
Sales Invoices
There are a number of ways your sales could get into Xero. You may sell online, via your website, or through a third party such as Amazon. In these cases you may not actually issue Sales Invoices to customers. However, sending a traditional invoice for payment is the most used option.
Assuming you haven’t converted a quote then this is how you would raise a sales invoice:
BUSINESS >>> SALES OVERVIEW >>>> NEW
This screen is actually very similar to the quote screen and is very similar to the purchase screen.
The Key Fields are:
To: Enter the name of your contact – it will autofill if you have a contact already set up
Date: The date on the invoice
Due Date: The date the invoice is due (remember to use +30 and that these can be pre-filled)
Invoice Number – auto-filled
Branding – Use if you have more than one brand set up (Change to Application if you are sending an Application For Payment)
Select Item – Select pre-filled product or service item or type description
Quantity – this is always 1 but you can choose to increase this if required
Account – this is your sales Account as listed in your chart of accounts
Tax Rate – This is the default tax rate for the account chosen. If you are VAT registered this will normally be 20% if you are not VAT registered this will be No VAT.
Tracking Department – The demo company uses Region to illustrate a tracking category but your tracking or department heading will show here.

")
")
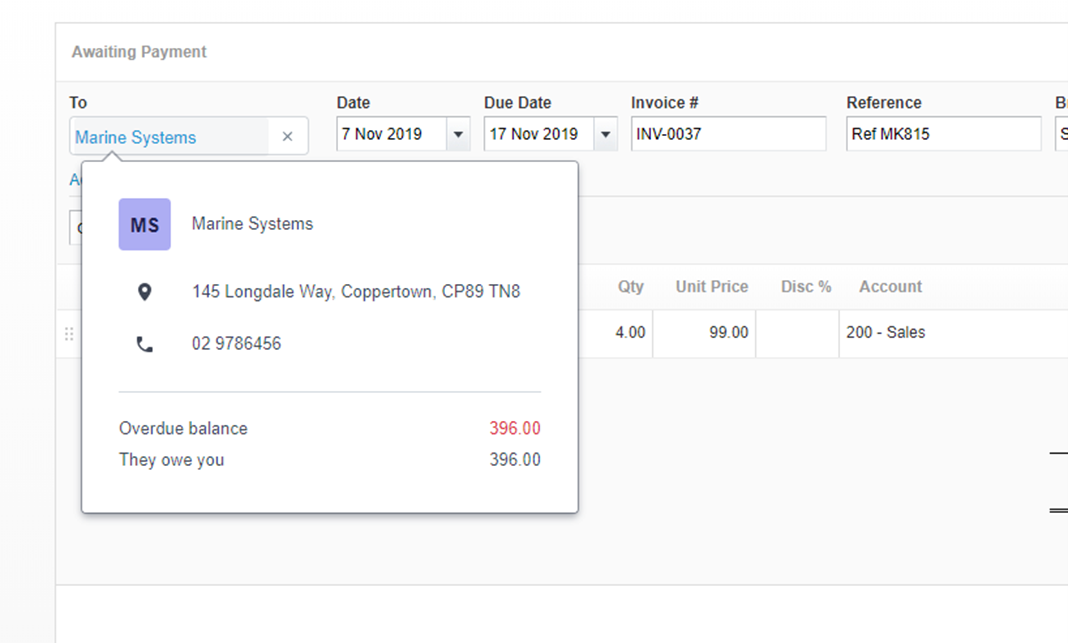
Before you save your invoice but after you have entered your contact you can now hover over the name and see a breakdown of what they owe you. The idea of this is you can see if they are overdue with any invoices before you supply them.
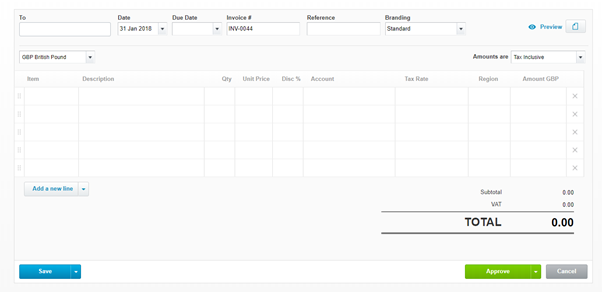
Once you have finished your invoice will look like this:

You can Save as a draft or approve this onto your system
To send it you have options of Emailing this from the software using the button or printing this as a PDF.
When you email the invoice you have the option of sending the invoice via the Xero Network so that it’s automatically posted into the customer’s Xero.
Once you have saved or approved the invoice for a new contact you will get the chance to enter their address and email address before you proceed. You can also do this later in the contact menu.
Further invoice options at this point are:
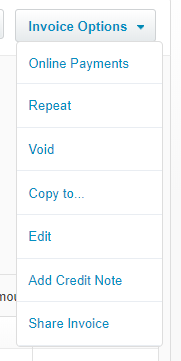
Online Payments – Add a payment link to invoice such as PayPal or Gocardless
Repeat – set up this invoice to repeat every month
Void – Remove this invoice as if you haven’t posted it
Copy to– Copy the invoice detail to send another invoice
Add a credit note to this specific invoice.
Share Invoice – get a link to the online version of this specific invoice
The two worth exploring more are:
Repeat
When you click repeat it copies the invoice detail into a new invoice
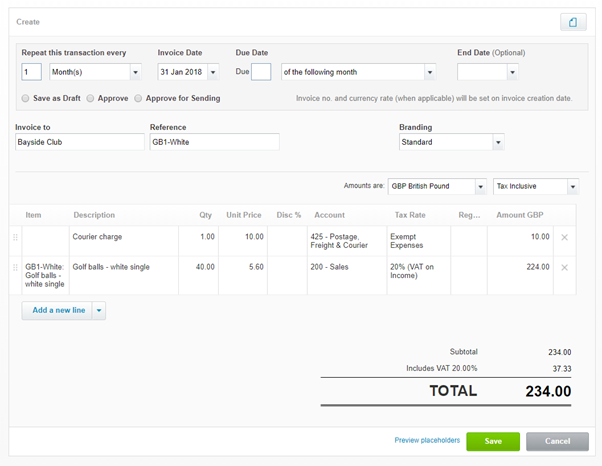
The difference this time is this strip

This allows us to repeat this invoice at intervals of months or weeks for a set date.
This is perfect for anyone who regularly invoices for the same thing such as regular maintenance or for someone who runs a subscription service.
The options for the repeating invoice are:
- How often to repeat
- The date of the next invoice
- The due date of the invoice
- And the end date.
Then you have the option of how the invoice is treated when it created it can be:
- Saved As Draft
- Approved
- Approved for Sending
If you approve for sending Xero will sending the invoice automatically and give you the option of writing the email.
")
New Invoicing
Xero has released new invoicing that which has changed the appearance of many of the items above. New invoicing is optional and can be seen in the video below:
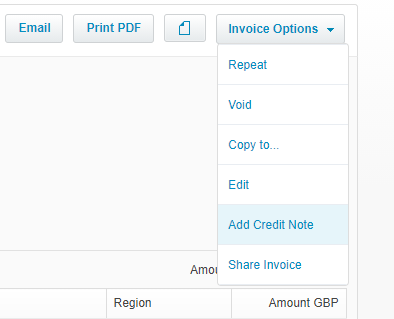
Adding a Credit Note
A credit note is the opposite of an invoice, it either cancels out an invoice (or part of an invoice) you have issued or sits on a customer’s account waiting for you to issue invoices in the future.
There are actually two ways to add a credit note in Xero and we will look at them both.
- Direct via the options here on the invoice
- Via a new credit note from the sales menu
- The Direct Method
This is for when you have posted an invoice and it’s wrong and you want to credit this one specific invoice with one specific credit note.
You would normally receive a credit note – find the invoice and then credit against it.
- The New Credit Note
If you receive a general credit note and either want to allocate it to several invoices or aren’t ready to allocate then you wouldn’t put one via the direct method you would go to:
SALES OVERVIEW>>>> NEW >>>> CREDIT NOTE
The Credit note screen looks uncannily like the Sales Invoice Screen. Just a different colour:
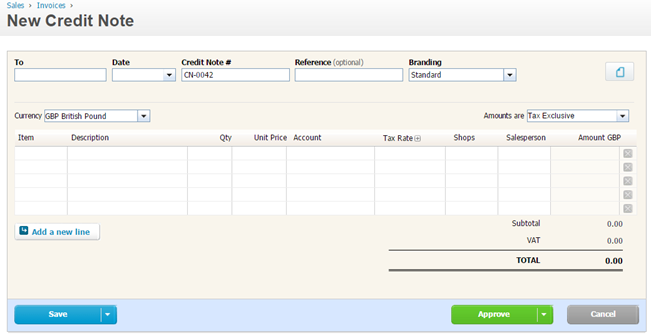
Complete the details in much the same way you would an invoice.
As soon as you approve this credit note your stock will be updated.
In addition, if you have unpaid invoices you will be given the option to allocate the credit against an invoice.
You will then see this dialogue:
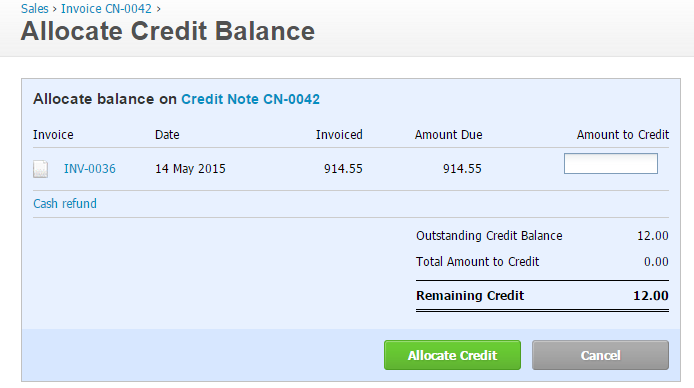
This is where you can allocate your credit against existing invoices if you wish – if not then just cancel the allocation.
Bank Receipts and Cash Refunds
I will cover this in more detail in the bank section but you need to know that at the bottom of every invoice and credit note there is the option to post a manual receipt (in the case of invoice) a manual cash refund (in the case of a credit note)
This is what it looks like on an invoice

")
It’s very unusual to do this for a sales invoice it’s more like to do it on a purchase invoice.
This is what looks like on a credit note is:

The only difference is you are refunding cash when an invoice has been paid off by you on Xero.
Again as this is a manual payment an unreconciled payment is created in the bank account which waits for the cash to actually come out of the bank before matching it but more about that later.
Where are my invoices listed?
So you have saved your sales invoice but want to find it again.
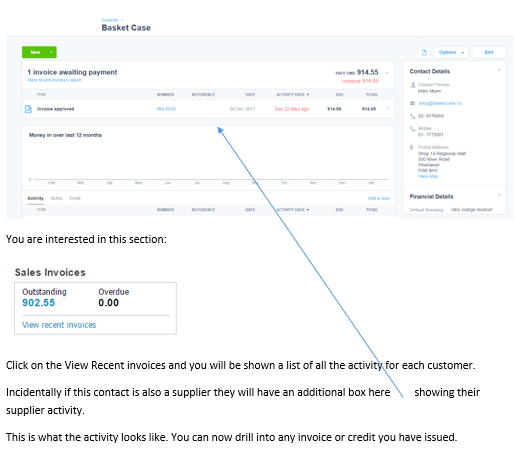
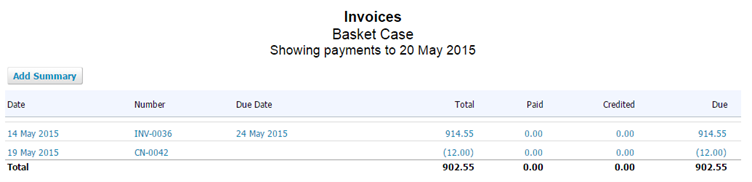
There are several ways of navigating to an existing invoice from the dashboard but by far the quickest is by finding the Customer and looking at the activity.
So:
CONTACTS >>>> CUSTOMERS
Find the customer and you will be taken to this screen:
 You could also use the universal search function:

or clicking on Business >>>>>>>> Sales Overview >>>>>>>>> See ALL